Mushroom Cream Pasta (My Interpretation of Forest Floor Frenzy)

Going out to a restaurant with me can be a bit of an adventure. Growing up it was sort of a given that my family and I would share (or at least sample) everything we ordered, and as a result we would consult with one another on all of the dishes we wanted. Under no circumstance would we ever order two of the same things. Why? Because there are always new menu items to try and what if the item we ordered two of was mediocre? Duplicates are boring.
These days when I’m out at a restaurant with friends I tend to subtly (or not so subtly) recommend dishes they should order—mainly dishes that I want to try but don’t want to order myself. When I went out to dinner with a good friend a few months ago I was torn between two items: some sort of ragu pasta and a Forest Floor Frenzy, a glorious pasta dish with a mushroom, sherry, and cream sauce. Shortly after opening our menus it was established that my friend would order the mushroom pasta since it is one of his favorite dishes. Since I refuse to order the same dish as anyone else at the table I decided to order the ragu, a dish that ended up being tasty, but rather forgettable.
I ended up having serious entrée envy after sampling a few bites of my buddy’s life-changing, delicious pasta dish. I quickly decided I would order the Forest Floor Frenzy every time I went back to that restaurant, even if everyone at the table ordered the same… although I might persistently recommend others order something else…
What made the dish so divine? I’m not sure. The chef has appeared on local cooking shows to prepare the dish and I’m sure you can find the recipe somewhere on YouTube. The recipe itself isn’t that difficult or complex: pasta, mushrooms, sherry, cream, and walnuts. While these are all simple ingredients the whole is much greater than the sum of its parts. It’s just a flawless combination. Here is my interpretation…

Forest Floor Frenzy (Mushroom Cream Pasta)
Inspired by Bizzarro Italian Cafe
- 1 pound pasta (a parpadelle, tagliatelle or fettucini is ideal but whatever you have on hand will work [I used mini bow tie])
- 4 strips bacon, cut into lardons (small strips)
- 1/2 large onion, diced
- 1 pound assorted mushrooms (I used portabello and crimini), cleaned and chopped into a medium to large dice
- 4 garlic cloves, minced
- 1/4 cup sherry (white wine would also work)
- 1 tablespoon minced fresh thyme leaves
- 1 teaspoon salt
- 1/2 teaspoon freshly ground black pepper
- 1 1/2 cups heavy cream
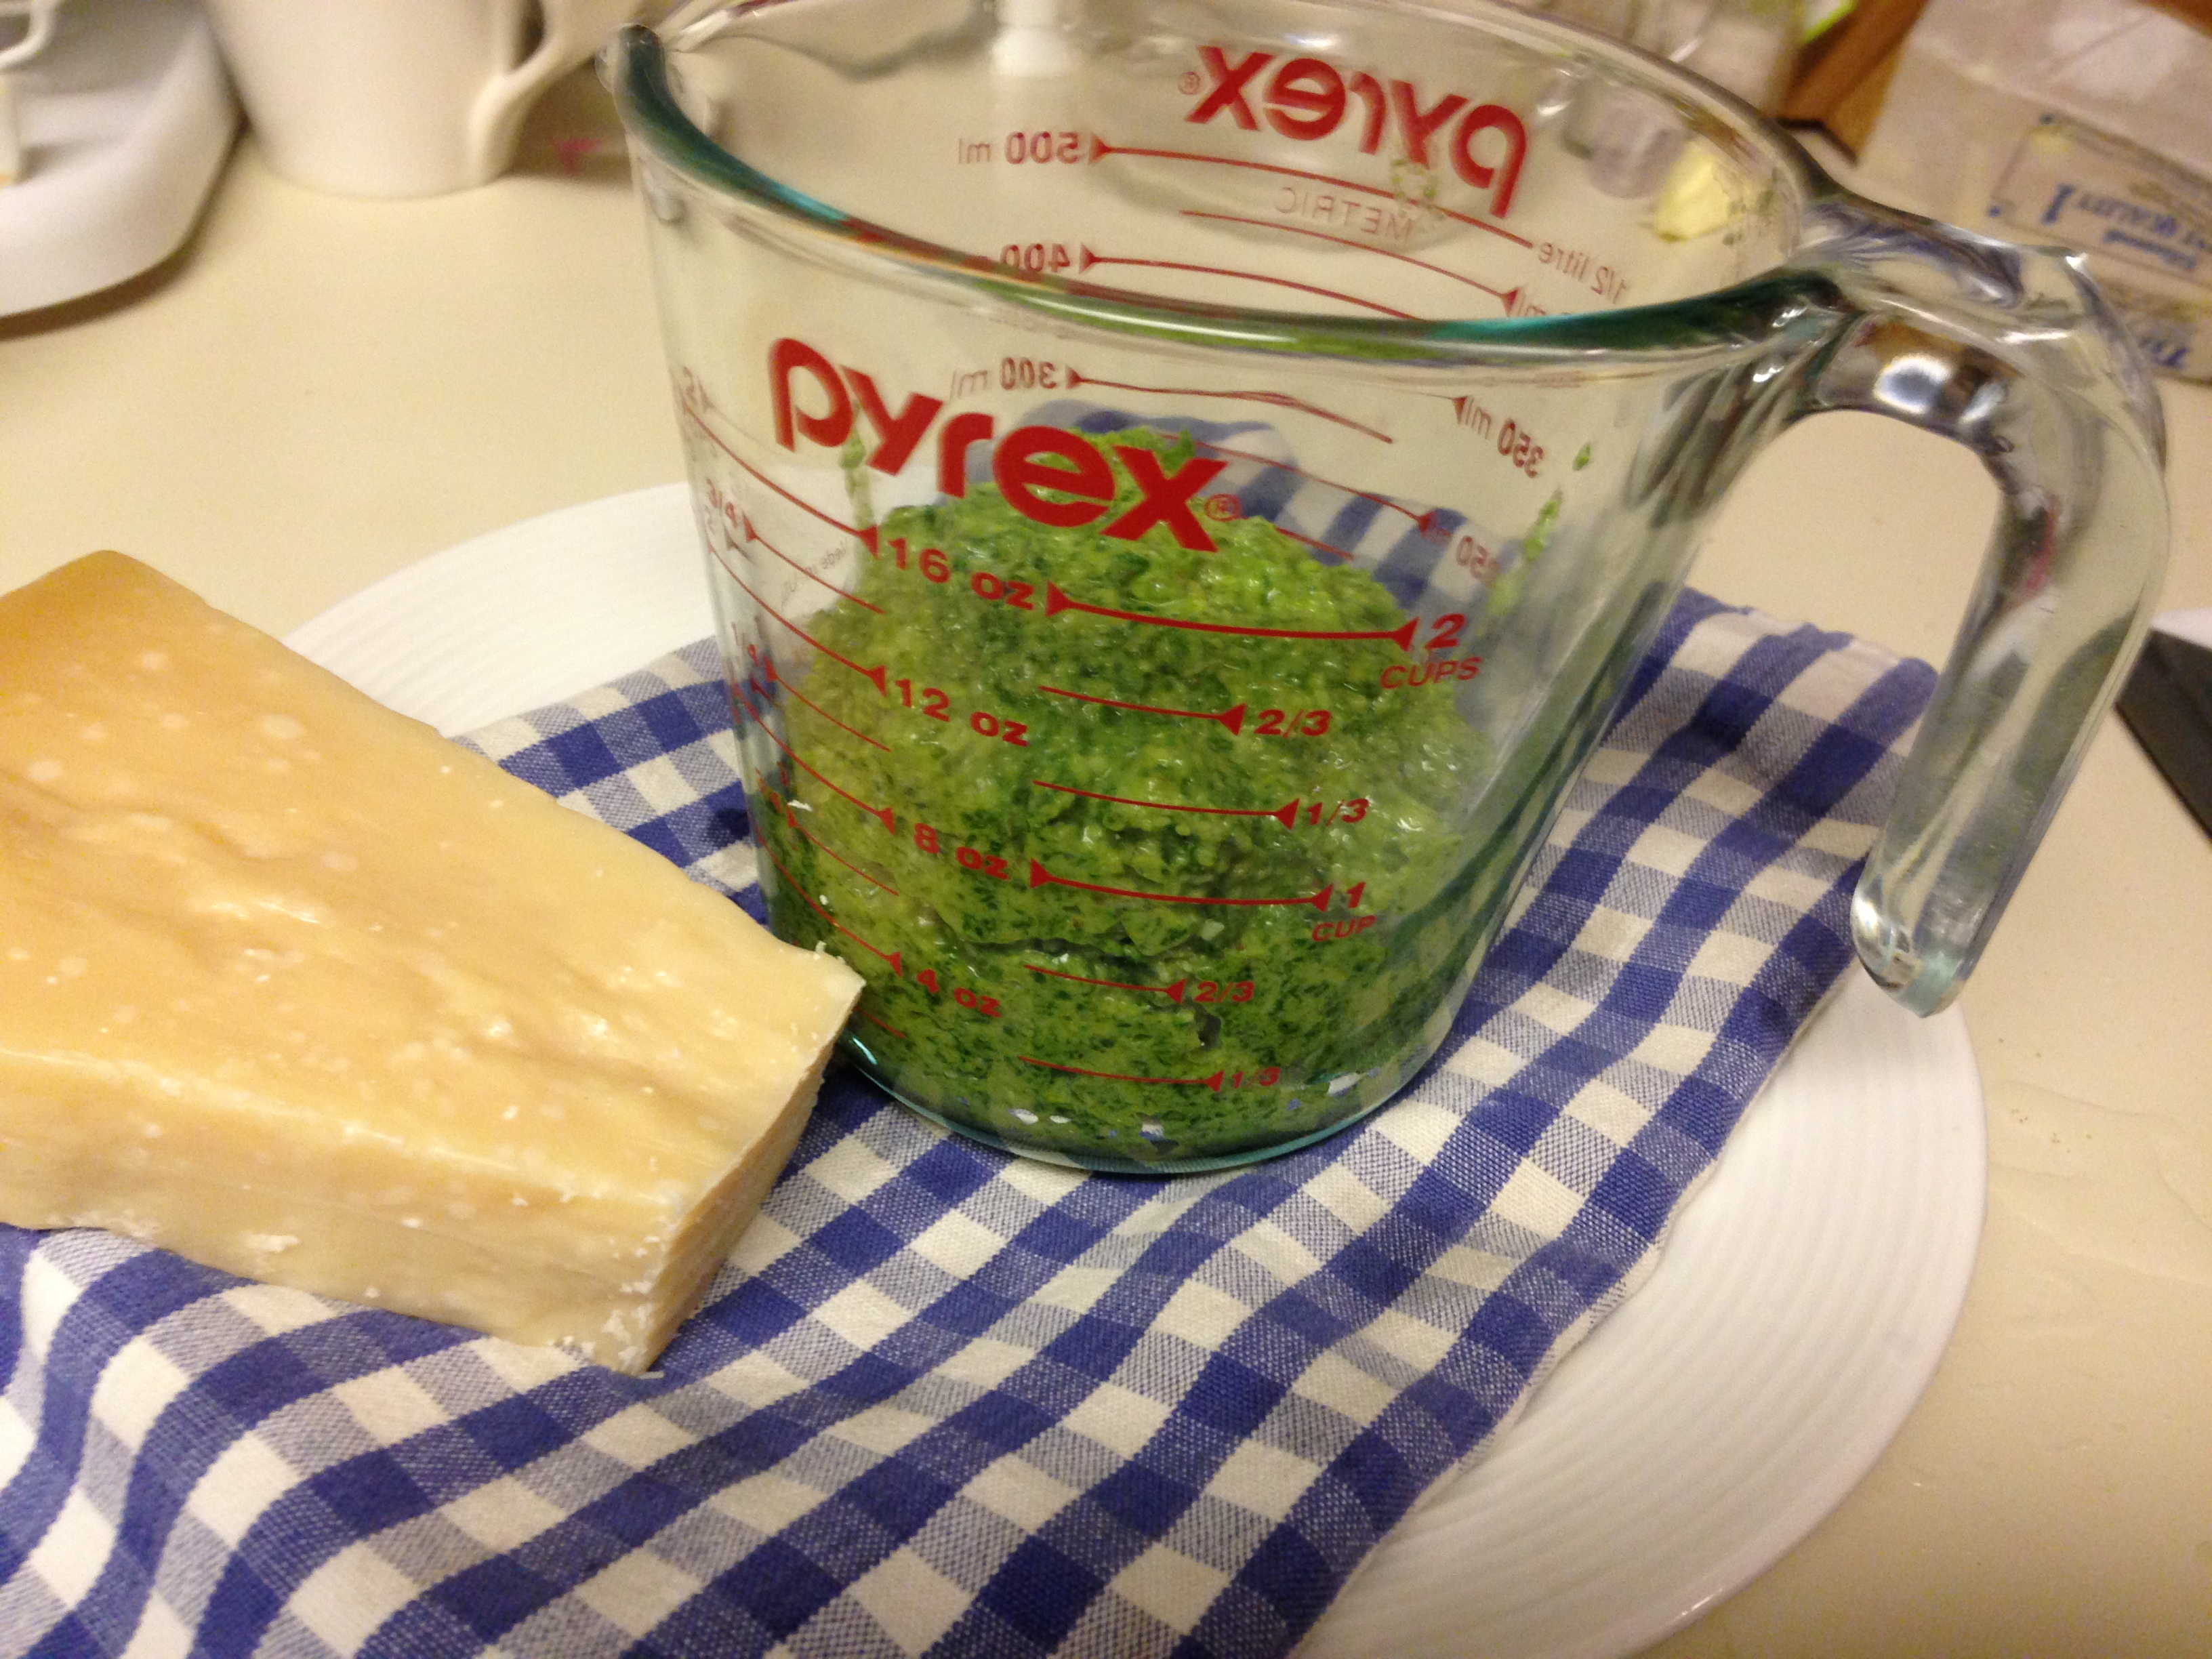
- Approximately 1/2 cup Parmesan cheese plus additional for serving
- 3/4 cup chopped walnuts (optional but a nice crunchy addition)
- Chives for garnish (optional)
Cook bacon until crispy in a large sauté pan over medium to medium-high heat, remove using a slotted spoon and blot grease with a paper towel; set aside.
Meanwhile, in a large pot of boiling salted water, cook pasta until al dente (usually a minute or so less than package instructions).
In the same sauté pan you cooked the bacon in (no reason to remove the grease), cook onions over medium-high heat for a few mintues, until softened, Add mushrooms and cook for 4 minutes, stirring occasionally. Add the garlic and cook for 2 additional minutes. Add sherry and scrape up any bits stuck to the pan and cook just until alcohol has burned off and has slightly reduced in volume. Add thyme, salt, pepper, and cream and cook for approximately 5 minutes, until thickened and reduced.
Toss together with cooked pasta, bacon, walnuts (if using), and parmesan; taste for seasoning, transfer to individual serving bowls and top with optional chopped chives and additional parmesan.
(6 Hour) Lamb and Beef Short Rib Ragu

So, I’ll start off by saying this is one of the best things I’ve ever made. Tender, fall-off-the-bone meat is one of my favorite things in the world and after making this dish I realized it only gets better when it’s been braised in a rich, decadent tomato sauce. I’ve made my fair share of ragu sauces before with mixed results; really, I had made decent versions, but none that I could declare exceptional (and certainly not a ragu I would describe as being one of the best things [period] I’ve ever made).
I initially found the recipe on The Amateur Gourmet (where it was adapted from Canal House Vol. 2.) and I have to say it sounded a bit odd. Besides salt and pepper, the dish is mainly seasoned with nutmeg and anchovies. While many may think “weird” or “eeeew,” I could only think of how much I wanted to make it. See, when I’m at a restaurant I try and order the weirdest, most unique thing on the menu. I’m totally that guy that will order a Yak burger or tofu glazed in squid ink. So when a spice that can go either sweet or savory and a fish I’ve only used in salad dressing showed up in a tomato sauce recipe I just had to try it.
The thing I loved most about this is how versatile it was. I found it most delicious served with pasta, but I loved it over soft polenta and a few nights later when I was feeling “healthy” I found it to be delicious over brown rice. It was even perfection spooned over a crusty piece of bread. Next time I make it (which I hope is soon) I definitely plan on using it as a sauce in lasagna and I think it would be divine served over gnocchi. It makes a pretty hefty portion and the leftovers reheated really well (I actually think they tasted better a day after it had been made as the flavors melded more).
Before I give you the recipe, here are a few tips:
- You should be able to find lamb neck and beef short ribs at most butchers
- Do not rush the browning process on the meat! It will have more flavor the browner it gets.
- Do NOT taste the sauce the first hour or two. I wanted to make sure it was seasoned properly but nearly gagged on the heavy anchovy taste. However, the anchovy flavor really mellowed out a few hours into the cooking process and became much more balanced. In the end, you really couldn’t tell there were anchovies—simply added a je ne sais quoi quality.
- With so few ingredients, make sure you use good ones! Freshly grated nutmeg has much more flavor so go with that instead of the pre-ground stuff in the spice bottle. Also, now is not the time for a cheap wine! Lastly, I find that San Marzano tomatoes have the best flavor (definitely worth the extra buck or two per can)
Lamb and Short Rib Ragu
- 1.5 pounds lamb necks (or shoulder chops) (should be roughly one lamb neck)
- 1.5 pound beef short ribs
- Salt and pepper
- Olive oil
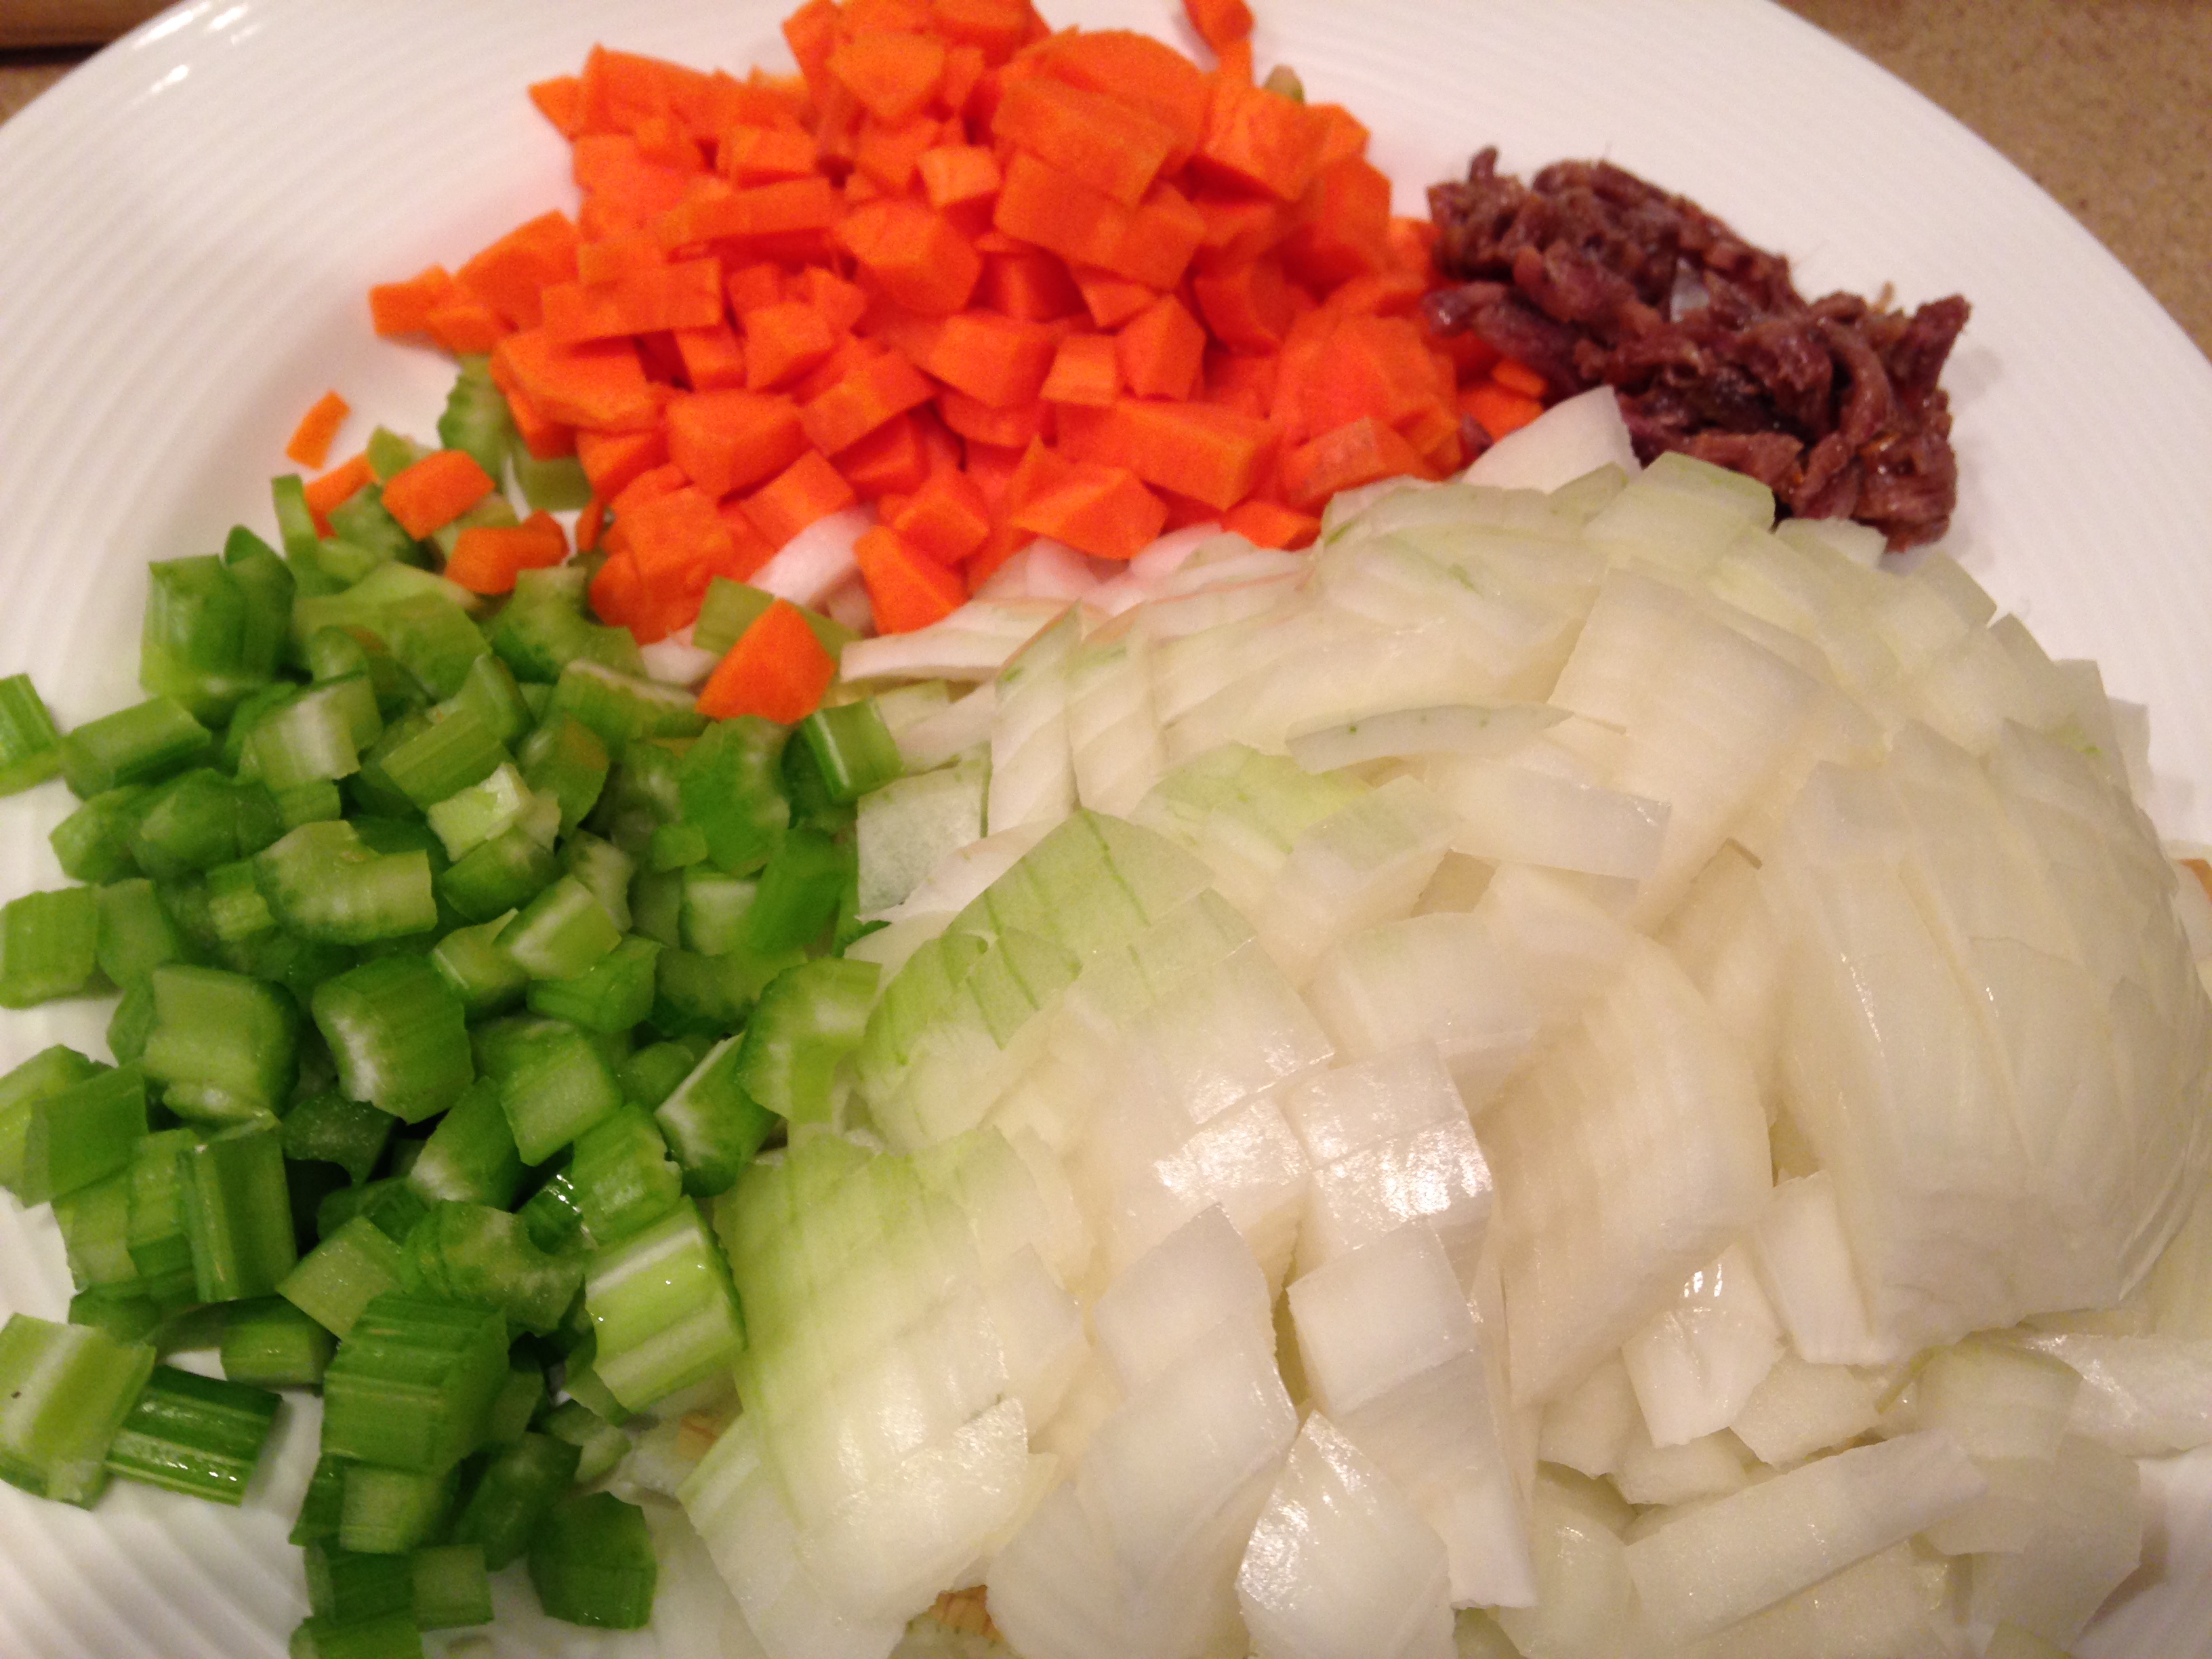
- 1 large yellow onion, diced
- 1 large carrot, peeled and finely diced
- 2 ribs celery, finely diced
- 2 cloves garlic, minced
- 5 anchovy fillets, finely chopped
- Approximately 1 teaspoon grated nutmeg
- 2 cups white wine
- One 28-ounce can crushed tomatoes
- One 15-ounce can plain tomato sauce (weird, I know, I used plain Hunts)
- Handful of fresh parsley leaves, finely chopped, for garnish (optional)
- Parmesan cheese (optional)
In a large, heavy, deep skillet or pan (I used a 5.5 quart Dutch oven that was almost filled to the brim), heat up 2 tablespoons olive oil over medium to medium-high heat. Let heat until nearly smoking. Meanwhile, pat meat dry with paper towels (dry meat sears better) and season with salt and pepper.
Sear and brown meat in batches (I found it took two batches) until browned on all sides. Do not rush this process as browned meat has more flavor. It probably took about 5 minutes per side for a very browned crust. Remove meat from pan and continue additional batches. Meanwhile, chop and prepare remaining ingredients.

Once all meat has browned and been removed, add in onion, celery, and carrot (I found there was enough grease in the pot from the meat, but add more olive oil if necessary). Cook vegetables until nicely browned (approximately 8 minutes), then add garlic and anchovies and cook for a minute or so longer (you don’t want to brown the garlic too much as it takes on a bitter taste).
Pour wine into the pan and scrape up any crusty bits stuck to the pan (so much flavor!) and cook for a minute or so, until wine has just slightly reduced.
Return meat to the pan and pour in the crushed tomatoes and tomato sauce. Bring to a low boil and reduce to a simmer (low heat) and cook (uncovered) for approximately 3.5-4 hours, stirring occasionally. I added a few splashes of water here and there to ensure the sauce didn’t get too thick, but don’t fret too much, you’ll only need to add half a cup or so the entire cooking process.
Once meat is fork tender, remove from pot, let cool slightly, and shred, being sure to discard bones, large pieces of fat, and any gristle. Return shredded meat to pot and continue cooking for 1.5-2 more hours.
Serve over pasta, polenta, or rice; sprinkle with parsley and/or parmesan cheese, if desired (it was so good, even without cheese, which you’ll never hear me say [I typically think cheese makes everything better]).
Prepare to enjoy an epic meal!

Spaetzel with Fresh Herbs

Every time I enter a Sur la Table, Williams-Sonoma, or any establishment that sells kitchen equipment I fantasize about buying one of everything. Sadly, my small kitchen is almost at full capacity and I can hardly open a cupboard or drawer without various cooking and baking gadgets falling out. And then you factor in that I really can’t afford one of everything (or even one of 1/100 of everything [if that]) and I realize improvising is not only fun, but also economical. I remember the days before even having a rolling pin when I just used a red wine bottle. A good home cook should be able to substitute ingredients or devices as needed.
But that’s not to say I don’t have one or two single-use gadgets that vastly improve my life. And even though I so rarely use some of them I smile when I dust them off, as I know they make cooking so much easier.
Before embarking on the adventure of making spaetzel I tried to read almost every review on zee interwebz. I not only wanted a tasty spaetzel, I also wanted an easy method. Long before a spaetzel maker was invented, people made do without. If millions of people could do it without a device I figured I could, but I quickly realized I had no desire trying to press gooey dough through a strainer over steamy, boiling water. So, I headed to my local cooking store and bought a single-use device for a very reasonable price.

If you feel like improvising and using a colander, DO IT! Use a colander with holes about 1/4 of an inch wide and using a flexible spatula, press the spaetzel dough (or is it batter?) through the holes. But really, I promise a spaetzel maker is way easier and pretty cheap.
Spaetzel with Fresh Herbs
Adapted from Wolfgang Puck
After searching high and low for a spaetzel recipe, I finally stumbled across one from Wolfgang Puck. While I was underwhelmed after visits to three of his restaurants (I’m sure they would have been 5 star experiences had he actually been in the kitchen making my food), I couldn’t think of a better recipe source. And he (and his recipe) definitely didn’t disappoint. They managed to be light but had a bit of bite and chew left in them.
- 4 egg yolks
- 1 egg
- 1 3/4 cups milk
- 1 pound all purpose flour (I use the “spoon and sweep” method of measuring flour and found it equaled 3 cups plus 2.5 tablespoons)
- 1/4 teaspoon freshly grated nutmeg
- 1 teaspoon salt
- 1/4 teaspoon freshly ground pepper
- 1/4 cup plus healthy drizzle olive oil
- Salt Pepper, to taste
- 2 1/2 tablespoons unsalted butter
- 2 tablespoons fresh minced parsley
- 2 tablespoons fresh minced dill
In a small bowl, beat the egg yolks, egg, and milk together.
In a medium bowl, combine the flour, nutmeg, salt, and pepper. Add the egg mixture to the flour mixture and mix until blended. Do not over mix at this stage. Cover the bowl and refrigerate. Allow the batter to rest for at least 1 hour (or overnight).


Bring salted water to a boil in a large pan.
Using a spaetzel maker (or other method), press spaetzel batter into boiling water. Cook for approximately 3 minutes (it helps to cook in batches, to ensure spaetzel doesn’t stick).
Transfer cooked spaetzle to a bowl of ice water to shock. When cool to the touch, drain well. Stir in a healthy drizzle of olive oil (about 1 1/2 – 2 tablespoons). (At this point you can cover and refrigerate up to 2 days) <–Those were Wolfgang’s directions. I found that on day 2 the spaetzel was more gummy, but still fine. I would recommend cooking the same day.
When ready to serve, heat a scant 1/4 cup of olive oil in a large sauté pan over medium-high heat. Once oil is hot, add the spaetzel but DO NOT stir for 2-3 minutes. You want the spaetzel to slightly brown. After a few minutes, stir in the unsalted butter. Continue to cook for a few more minutes until thoroughly heated and lightly browned. Remove from heat, season with salt and pepper to taste, and sprinkle with freshly chopped herbs. Serve immediately.

Cooking With A Broken Limb (Kitchen Sink Pasta Salad)

My nerves were getting the best of me as I attempted to crack a safe on an eerily quiet, dark evening. The only sounds I heard were the quiet splat of raindrops on a window and the sound of my heart rapidly beating. I was in the house of a wealthy recluse who was known for hoarding money, jewels, saffron, truffles, and caviar. My credit card bill was due and I had been coveting the Audi R8 and I knew I the only way I could pay for either was to rob a bank or someone rich. There was just one thing in between me and the sexiest car in the world, an abundance of the most expensive spice, and enough cash to last me a lifetime: this stupid safe. I knew I shouldn’t have trusted Safe Cracking for Dummies, it wasn’t any help at all and I had no idea how I was going to crack a supposedly uncrackable safe.
I was contemplating my next move when I heard footsteps. I tried not to hyperventilate; concerned any sounds I made might make my presence known. I could have spent a few more minutes trying to open that damn safe, but I decided to make a run for it, sprinted towards the nearest window, and jumped out. Thankfully the sidewalk broke my fall and prevented me from serious injury. I was thankful to only have broken my ankle.
….
Okay, so maybe I broke my ankle when I fell down while walking. I was on my way to meet up with some friends.
Hobbling around on crutches tends to lead people to ask me what happened to my very broken ankle. I’ve heard such cool stories involving snowboarding, sports, parachute accidents…. It’s just kind of sad that that the sidewalk was wet, I slipped, and I managed to break my ankle. I’m totally open to any stories I can tell people since I’m sick of telling the same boring account of how I sustained my injury.

Being on crutches has made cooking a bit of a problem. I’m very reliant on the amazing people in my life to feed me and chauffeur me about. Most endeavors in the kitchen have turned out with subpar results. I haven’t had much creativity and even when I have hobbled into the kitchen with my crutches nothing has turned out very well. It’s been discouraging to have less than stellar results and there’s only one thing that stands out as a success: Kitchen Sink Pasta Salad.
I stumbled across a recipe for an intriguing pasta salad on The Amateur Gourmet a while back. I enjoy his blog and had success with the one other recipe of his I’ve made. What I liked about this recipe is that it isn’t so much a recipe, but a guideline in which you can switch out ingredients for others, basically use whatever is convenient.
My version follows the original pretty closely, but with a few alterations. If you make this, feel free to add whatever you have on hand!
Kitchen Sink Pasta Salad
Adapted from Kitchen Sink Pasta Salad
- 1 lb penne (the squiggly corkscrew ones or ziti would also be nice)
- ½ cup yogurt (Greek is best, but whatever is on hand will work, so long as it’s plain)
- Approximately ¼ cup sour cream
- ¼ cup olive oil
- ¼ cup apple cider vinegar
- Salt and pepper
- Handful of chopped dill
- Handful of chopped cilantro
The following are the fruits, veggies, and cheese that I used:
- A few handfuls of diced smoked mozzarella
- 1 cucumber, seeded and diced
- 2 shallots, medium dice
- 1 plum, diced
- 1 nectarine, diced
- A few stems of celery, diced
- One tomato, diced (I recommend roasting your tomato first, which is what I did)

1. Cook pasta to al dente
2. While pasta is cooking, mix together yogurt, sour cream, olive oil, vinegar, and salt and pepper to taste. My dressing was super tangy, which I enjoyed. If you want it to have a bit less bite, feel free to add a pinch of sugar.
3. Once pasta is cooked, drain and let cool slightly.
4. While the pasta is warm, but not hot, stir in the yogurt dressing. You want the pasta to still be warm as it will “drink” up some of the dressing and make the pasta more flavorful. It may look like you have too much dressing, but keep in mind you’ll add your remaining ingredients later which also need to be coated in dressing.
5. Let cool a few minutes more before adding all remaining ingredients.
I started eating mine when it wasn’t entirely cooled (because I was hangry) and thought it was fine, but preferred it once it had been completely chilled. This pasta salad had so much going on as far as flavor and texture. Creamy, crunch, tangy, sweet. It was an explosion of deliciousness and I can see myself making variations of this forever.
Pancetta, Pea, and Other Stuff Pasta

A little over a month ago I was out to dinner at this quaint little Italian restaurant, La Rustica. While everything we ate was very tasty, what really stood out (besides the tiramisu) was a pasta special, which had roasted red peppers, baby peas, caramelized onion, crispy bits of pancetta, finely chopped mushrooms, spaghetti, and a ton of other stuff, all of which were coated in a delicate sauce.
Fast forward a few weeks and I was in need of a quick dinner. La Rustica’s pasta left an impression and when I made a quick stop at the store, I bought many of the ingredients I remembered being included in that dish. The original was divine, but my tweaks and reinterpretation (and decision to just throw everything into a pot rather than roast some, saute others, etc) made for one exceptional pasta dish.
- 1/3 lb pancetta, chopped into a small dice
- 8 mushrooms (because 8 is my favorite number), chopped into a small dice
- 2 shallots, chopped into a small dice
- 1 red pepper, chopped into a small dice
- A few cloves of garlic, finely minced
- A few stems of thyme, leaves removed and finely chopped
- 1 cup plus a few additional splashes of chicken stock or white wine
- 1/4 cup cream
- 1 heaping cup baby peas (I used frozen, because they were cheap and convenient)
- Salt and pepper
- 1 lb pasta (I think a spaghetti or linguini would work best, I used whole wheat spaghetti)
Sauté pancetta, mushrooms, shallot, and red pepper in a pan over medium-high heat. Cook for approximately 10-15 minutes, until vegetables have caramelized and pancetta has crisped up.
Add garlic and thyme and cook for a few more minutes.

Meanwhile, prepare pasta per package instructions (be sure to generously salt the boiling water and cook pasta to al dente, or a minute less than instructed).
Pour in wine or chicken stock and be sure to scrape up any bits of veggies or pancetta stuck to the pan. Continue cooking over medium heat until some of the liquid has evaporated.
Mix in peas and cream. When the sauce is lightly bubbling, taste for seasoning. I used pancetta made by Salumi (a Seattle institution that makes some of my favorite charcuterie), which is incredibly well seasoned. I find it superior to other pancetta as it has a ton of flavor and is full of herbs and salt. As a result, I used very little salt and pepper as the pancetta provided such a punch of flavor.
At this point I strained my pasta, dumped it into the pan of sauce and coated each strand. You’ll want to let the pasta sit in the sauce for a minute or so to ensure it soaks up the flavor of the sauce.
I served the pasta with a small handful of Parmesan cheese and a piece of baguette (and yeah, I just ripped a piece of bread off the loaf seeing as this wasn’t a fancy party that required slicing bread or other nonsense).
Arugula, Walnut, Tomato Pesto Linguini

Growing up the only pesto I knew of was traditional basil and pine nut pesto. Maybe if you were daring you might heat it up and add some cream before tossing it with pasta. Sometime within the past 10 years or so it seems people started to make pesto from any variety of things ranging from peas to cauliflower to arugula.
While I love the flavor you get when you make pesto with ingredients besides basil and pine nuts, I love the cost even more. Have you bought pine nuts recently? They cost upwards of $32 a pound where you can get walnuts for $9. Basil? It’s really simple to grow but I rely on buying it (since, ya know, I live in an apartment) and it’s far from cheap at a store. Every now and then I love a traditional pesto, but most of the time I’m just too cheap to pay the price, plus I think variations offer more flavor.
Up until this week, a broccoli-based pesto was my personal favorite, but this arugula, walnut, and tomato pesto was spot-on (althought I lost a piece of my food processor while making this…. totally the pesto’s fault, not mine). Most importantly, it was so versatile. Perfect to spread on bread or crostini and exceptional when tossed with shredded chicken and linguini.
Arugula, Walnut, Tomato Pesto Linguini
Adapted from a variety of sources
- ½ cup of shelled walnuts
- 2 cups of packed arugula leaves, stems removed (roughly half a bunch)
- ¾ cup fresh Parmesan cheese
- ¼ cup extra virgin olive oil
- ¼ cup chicken stock (I used chicken stock in lieu of an additional ¼ cup of olive oil)
- 3-5 peeled garlic cloves
- Salt and pepper
- 4 tomatoes (I used vine ripened, but any smaller to medium sized tomato like a Roma would work fine)
- 1 lb linguini (I used whole wheat although any pasta would work)
- 2 shredded chicken breasts (optional)
- Freshly grated Parmesan cheese for garnish (optional)
1. In a dry pan, lightly toast walnuts over medium heat. This took about 5 minutes, stirring occasionally to ensure the nuts didn’t burn. Let cool.
2. Mix together nuts, arugula, cheese, olive oil, chicken stock, and garlic together in a food processor. Pulse until blended into a uniform, loose paste. Taste and add salt and pepper as desired. Feel free to use this as-is. It’s intensely green, garlicky, and light.
3. Remove pesto from processor. Place chopped tomatoes in your food processor and lightly pulse. Add your pesto and pulse until mixed. When you incorporate the tomatoes you’ll need to aggressively season with salt, as the tomatoes will absorb a lot of your existing flavor.
4. Prepare pasta per package instructions; however, cook for one minute less than instructed. Drain pasta and place pesto into the same pot. Heat pesto and add chicken (if using). Mix back in pasta and toss with pesto sauce. Let cook a minute or two more. Top with freshly grated Parmesan cheese, if desired.
Lastly, I want to point out how quick and simple this recipe is. I did my shopping at a new grocery store whose layout was…. confusing. I wondered around aimlessly trying to find everything on my list and then ended up getting stuck behind the slowest drivers in the world. By the time I got home I was hangry (so hungry I was angry) and the last thing I wanted to do was spend an eternity in the kitchen. Thankfully I walked in the front door with my groceries and within 20 minutes was eating pasta!

Recent Comments