Gingerbread Stout Cupcakes

There’s a local cupcake store in Seattle, Cupcake Royale, which has some of my favorite cupcakes. They have exceptional seasonal/monthly flavors and whether I’m enjoying a blueberry crumble cupcake in the middle of summer or a boozy eggnog cupcake in December, I’m always a happy customer.
My last trip to Cupcake Royale involved buying one or two (or like ten) cupcakes, one of which was practically life changing: a stout gingerbread cake. Beer, ginger, and cream cheese frosting are in the top 20 of my favorite things, and it was all I could do not to inhale this delicious cupcake. I immediately made it my goal in life to replicate this cupcake.
My results definitely weren’t a match in flavor as I ended up with something that packed a lot more heat from ginger and had a delightfully forceful taste of molasses, but I am in love with them. Definitely not for the faint of heart as the flavors are in no way subtle. They’re quite bold, in fact. So bold some may call the flavor overpowering. I, however, find them very nicely intense.
FYI, I used Dragonstooth Stout, a beer made in Seattle, that has a very intense coffee taste to it. If you’re really into stouts or porters, feel free to use your favorite! The most common and easily accessible one is Guinness.
Oh, and these stayed surprisingly moist for 3 days. Best when they’re freshly made; however, a day or two in advance would be fine if you’re short on time.
Gingerbread Stout Cupcakes
Adapted from David Lebovitz
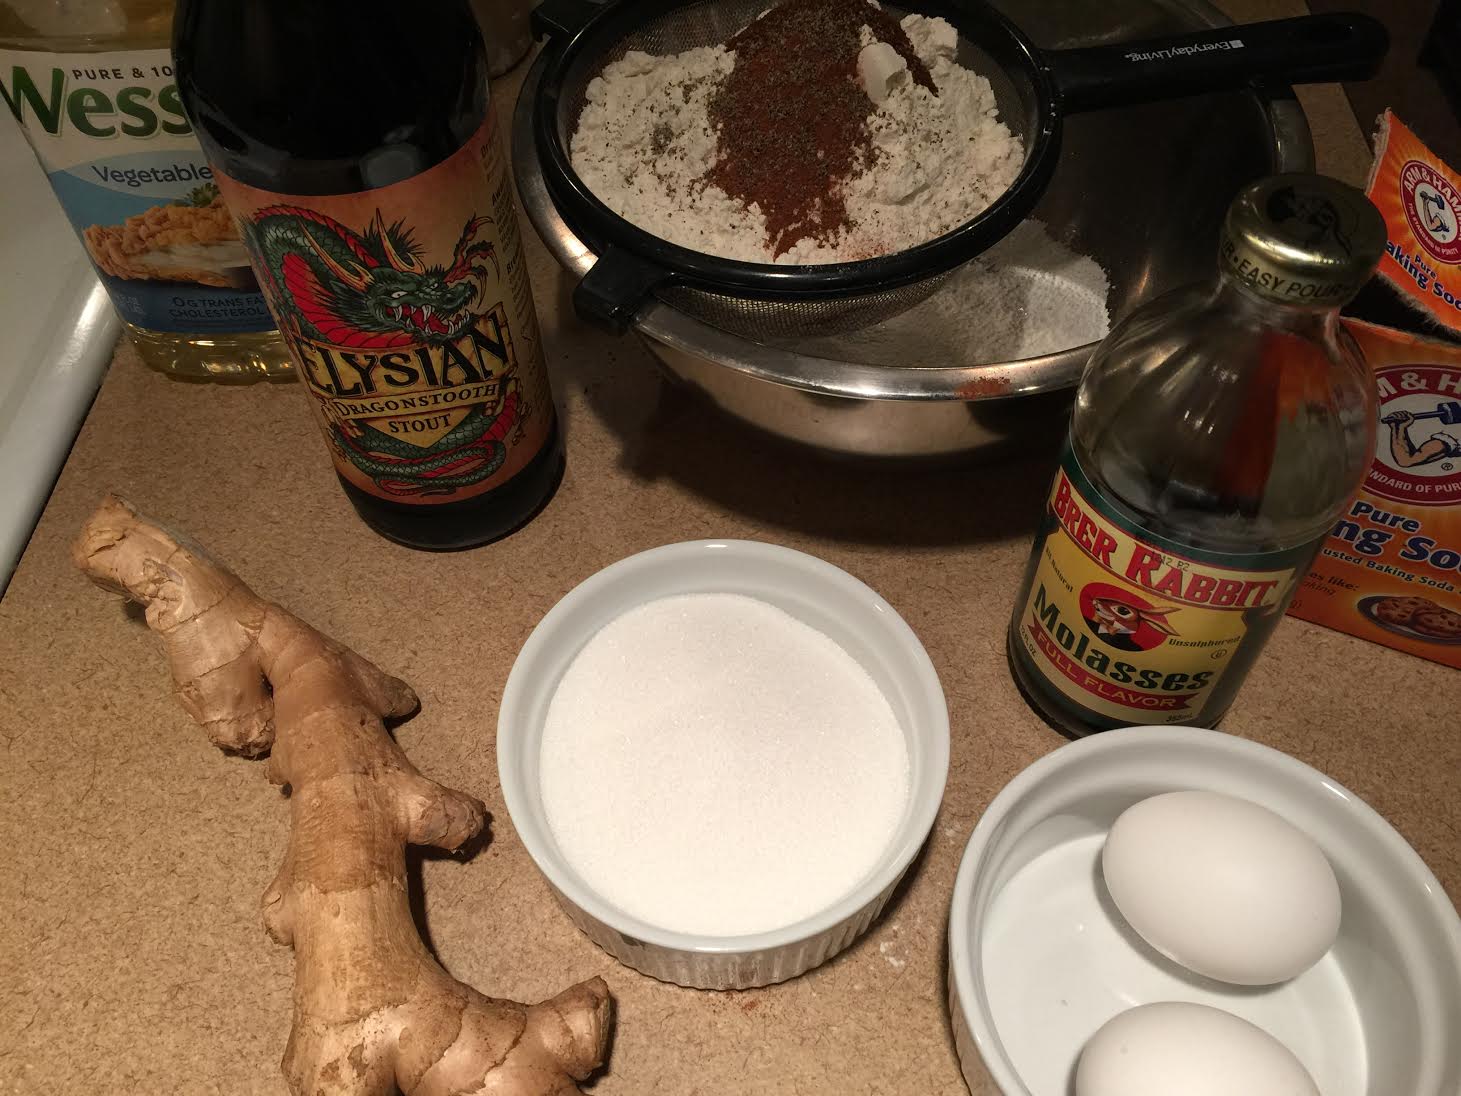
- 4 ounces fresh ginger
- 1 cup mild molasses
- 1 cup sugar
- 1 cup vegetable oil
- 2 1/2 cups flour
- 1 teaspoon ground cinnamon
- 1/2 teaspoon ground cloves
- 1/2 teaspoon ground black pepper
- 1 cup stout or porter
- 2 teaspoons baking soda
- 2 eggs, at room temperature, lightly beaten
Preheat the oven to 350°F. Line a 24 capacity cupcake pan with 20-21 cupcake liners (recipe made 21 for me).
Peel, slice, and chop the ginger very fine with a knife (or use a grater)—or, pulse in a food processor until very fine (which is what I did, very easy). Mix together the molasses, sugar, and oil. In another bowl, sift together the flour, cinnamon, cloves and black pepper.
Bring the stout/porter to a boil in a saucepan, stir in the baking soda, and then mix the beer mixture into the molasses mixture. Stir in the ginger.
Gradually fold the dry ingredients into the batter. Add the eggs, and continue mixing until everything is thoroughly combined. Pour the batter into the prepared cupcake pan(s) and bake for 18-22 minutes, or until the top of the cake springs back lightly when pressed or a toothpick inserted into the center comes out clean, or with only a one or two moist crumbs.
Cream Cheese Frosting
- 2 8-oz packages cream cheese, at room temperature
- 2 sticks unsalted butter
- 1 tablespoon vanilla extract
- 3 cups sifted powdered sugar
In a stand mixer fitted with the paddle attachment, or using a hand mixer, beat cream cheese and butter together on medium-high speed until slightly fluffy and well combined. Add in vanilla extract, mix slowly, and gradually add powdered sugar. Pipe on to cooled cupcakes.

Pear and Cranberry Cake

Every now and then I overthink things. Deciding what to have for lunch is occasionally a three hour long process where I have to ask 20 people what I should have and by the time I’ve decided it’s practically dinnertime. Friends of mine all know they shouldn’t ask me what I want to do during a weekend, since my answer tends to be “I don’t know, what do you want to do?” While I can make important choices under pressure, in my day-to-day life I can sometimes be a bit indecisive.
Deciding on what to cook or bake can sometimes be a challenge as well. Do I go back to a favorite recipe I’ve made before that has exceptional results, or do I try something new and different? Yesterday when I couldn’t decide whether or not do something familiar or new, I decided to settle and I made a few revisions to a recipe I knew I loved.
Several years ago smitten kitchen posted a recipe involving browned butter, obscenely whipped eggs, and sweet pears juxtaposed against the bite of bittersweet chocolate. It was a cake that I loved to make and within 2 months of seeing the post for the first time I had made the recipe 5 or 6 times. I thought it was that good.
Now that the recipe is officially a go-to in my arsenal, I thought it might be time to update it a bit. Don’t get me wrong, the pear and chocolate combination is delicious, but considering Thanksgiving is just around the corner, I thought it might be appropriate to swap out the chocolate for fresh cranberries. Texturally, cranberries aren’t at all similar to chocolate, but taste wise the tart bite of the cranberries is a great substitute to the bitterness of chocolate. Despite the fact that fall spices are nowhere to be found in this recipe, a bite of it was quintessentially autumn, and I think this would be a perfect addition to Thanksgiving dinner, or any dinner for that matter.
If anyone is indecisive on what to make, I’ll help you with the decision…. make this!

Pear and Cranberry Cake
Adapted from smitten kitchen
- 2 tablespoons cornmeal (small grind)
- 1 cup unbleached, all-purpose flour
- 1 tablespoon baking powder (yes, a tablespoon, that’s not a typo)
- 1/2 teaspoon salt
- 3 large eggs, at room-temperature
- 1 stick (1/2 cup) unsalted butter
- 3/4 cup sugar
- 2 pears, peeled, in a small dice
- 1 1/4 cup fresh cranberries, sorted and washed
- Powdered sugar and whipped cream for serving
Preheat the oven to 350°F. Butter a 9-inch springform pan and dust with cornmeal (you could also use plain breadcrumbs or flour), set aside.
Using a stand mixer with the whisk attachment, whip eggs on high until pale and very thick (beyond ribbon stage). This should take a minimum of 8 minutes using a stand mixer, 10+ using a hand mixer, and I would imagine a very, very long time if whisking by hand.

While the eggs are whipping, brown the butter by melting the butter in a medium saucepan over medium-high heat. Once butter has melted, it should start browning in approximately 4 minutes. Do not stir for the first few minutes, but once butter starts to bubble you’ll want to occasionally stir to ensure the solids don’t burn. You’ll know it’s done when it smells nutty and the white solids in the butter turn brown. Remove from burner but leave in a warm spot so butter doesn’t solidify.
Meanwhile, mix together the flour, baking powder, and salt together in a small bowl, set aside.
Add the sugar to the eggs and whip 2 more minutes, or until the mixture just starts to loosen. Reduce speed to the lowest setting, add one third of the flour mixture, half of the brown butter, a third of the flour, the remaining butter, and the rest of flour. Mix until barely combined, then lightly stir by hand with a spatula, to ensure all flour has been incorporated, being careful not to over mix.
Pour batter into prepared pan and lightly sprinkle the pears and cranberries on top.

Bake in preheated oven for 40 to 50 minutes, or until a toothpick inserted into the cake comes out clean or with one or two tender crumbs.
Let cake cook completely, dust with powdered sugar (optional), and serve with whipped cream.
Due to the juiciness of the pears and cranberries, this cake is still moist on the second and third days, if it isn’t all eaten before then.

(As if by magic, the cake rises over the pears and cranberries that were on top prior to baking)
Chestnut Stuffing

I think I have a rather odd (and occasionally useless) memory. I can remember the oddest facts like my high school ID number, the license plate numbers and birthdates of two of my former coworkers (that may sound weird and stalkerish but I had to know them for one of my responsibilities at work), exactly what I was doing and who I was with on 3/12/2008, and what my former roommate’s favorite color is. I can remember a lot of not extremely helpful details but for some reason I can never quite remember the more important things in life like where I put my keys or the name of my coworker I talk to several times a day.
As a young child I remember eating roasted chestnuts every year around the holidays. There was a street vendor that sold them in downtown Seattle and every year we would get some and it was something that I always looked forward to. That being said, I haven’t had chestnuts in over 15 years and I had zero recollection of what they looked like or tasted like. While a detail like that may be forgotten by many, I’m a total detail guy and almost always remember, vividly, the taste and texture of something I ate two decades ago. I could tell you all about the sauce I had with salmon on my 5th birthday.
While part of me was frustrated I couldn’t remember anything about chestnuts, besides always loving them, it was almost fun having no recollection because when I made them recently it was like having them for the first time. It was such a new and unique experience.
For those of you who haven’t experienced the awesomeness of chestnuts, let me tell you. For starters, they look like little yellowish/tan/orangeish brains once you peel them. Pecans kind of look like brains, but they’re so brown and I’m used to seeing them; chestnuts kind of scared me. You’ll also want to be sure to peel them quickly as the second they started to cool the shells became almost impossible to take off, and I kept finding little bits that clung to the flesh of the nut. And then there was the taste and texture (sweeter and softer than a normal nut), which were enjoyable but unexpected. While I may not be making a compelling case for my readers to roast chestnuts, you totally should, because your house will smell divine, and it feels so Christmasy and festive, especially if you roast them on an open fire (which sadly, I didn’t).
While you could eat roasted chestnuts right out of the shell and be perfectly satisfied, I think you’ll be even more pleased if you added them to stuffing (or dressing). They have a meaty, sweet taste that is unlike any other nut I’ve had and the texture is soft and it has an almost smooth consistency. I served my chestnut stuffing with roast duck, but I think this would pair nicely with turkey, goose, pork, or beef.
Chestnut Stuffing
Adapted from Ted Allen
- 1/2 pound fresh chestnuts
- A large baguette (or bread of your choice), torn or cubed in small pieces (approximately 8-10 cups)
- 1/3 lb pancetta, thinly sliced and diced, diced (bacon could also work)
- 1/2 stick unsalted butter, plus more for greasing baking dish
- 1 large yellow onion, chopped
- 2 celery ribs, chopped
- 3 garlic cloves, finely minced
- 1 1/2 to 2 cups chicken or turkey stock (I used 1 1/2 cups, but use more or less if you like softer or crispier stuffing)
- 1/4 cup fresh flat-leaf parsley leaves, finely chopped
- 1/4 cup fresh sage leaves, finely chopped
- 1 tablespoon finely chopped rosemary
- 1 tablespoon finely chopped thyme
- 1 teaspoon kosher salt
- 1/2 teaspoon freshly ground black pepper
- 2 large eggs, lightly beaten
Preheat the oven to 400 degrees F.
Cut an X into the round end of each chestnut, place on a rimmed baking sheet, put in the oven and roast for approximately 15-20 minutes. Once done, the shells should peel back where cut and expose the flesh of the nut. Let cool for a minute or two, and then peel while the chestnuts are still warm. Chop coarsely. If you let the nuts get too cool and find the shells too hard to peel, throw them back in the oven for a few more minutes to warm up; this should make the process easier.
Decrease the oven temperature to 350 degrees F. Spread the cubed bread on a baking sheet and bake until dry and golden, about 15 minutes. Put in a large bowl with the chestnuts.
Meanwhile, in a large sautee pan, over medium heat, cook pancetta until slightly browned and beginning to get crispy. Add onion and cook until translucent (approximately 6 minutes). Pour into chestnut and bread mixture. Using the same pan, now empty, melt butter and add celery and garlic; cook for a few minutes (you could cook longer to make the celery soft, but I enjoy it when it’s still crunch). Add to chestnut and bread mixture.
Stir in the chicken stock, parsley, sage, rosemary, thyme, salt, pepper, and eggs. Mix well. Spoon into a buttered 3-quart baking dish and bake, covered, for 30 minutes. Uncover and bake until browned, about 30 minutes.
Incredibly Simple Roast Duck

Die Hard (and to a lesser extent Die Hard 2) is pretty much the best movie to watch on Christmas Eve, don’t you think? I mean, it’s set during the holidays and who doesn’t love a Christmas themed action movie? I know my family and I do and we watch it almost every Christmas. Maybe not the most traditional tradition, but it’s become our thing. Some other rituals include:
- Every Christmas Eve I read The Night Before Christmas, and of course, SantaLand Diaries from David Sedaris with my mom.
- One of my oldest and closest friends and I go to three or four malls to finish (and sometimes start) our Christmas shopping on 12/24.
- For the past few years Christmas Eve dinner has been sushi and champagne.
- No matter how late I go to sleep on Christmas Eve I will likely wake up around 6 am on Christmas Day… and force everyone else to wake up so we can open presents (the only morning I’m a “morning person”).
- Christmas mornings (although all mornings, really) are incomplete without bacon and at least one cookie.
- And lastly, one of my favorite traditions is that our Christmas Day dinner changes every year…
Sometimes it’s turkey, others it’s roast beef or prime rib, maybe one year it will be a ham or lamb. Whatever my family decides to make it’s guaranteed to be delicious, but just not the same from year to year.
Wanting to experiment with proteins I haven’t had on Christmas Day (or cooked at all) I decided to test out a duck recipe. I adore duck and whether it’s fries fried in duck fat, a crispy skinned breast, or duck confit, I’ll eat it all. The problem with cooking duck was to first find a recipe. I like how duck can really hold up to strong flavors or sauces but I was unsure if I even wanted to make a glaze or go with a simply roasted duck. After following the guide from NY Times to roast my turkey on Thanksgiving (which turned out perfectly), I decided their simple, straightforward approach to duck should have equally good results… and it did!
Roasted Duck
From NY Times
- 1 duck, approximately 5 pounds (neck and giblets removed from cavity)
- 1 tablespoon salt
- 1/2 tablespoon pepper
- One lemon, zested and cut into 8ths
- A small handful of assorted herbs (I used thyme, rosemary, and sage)
- Several cloves of garlic, smashed (you don’t even need to peel them, just smash)
Using paper towels, pat duck dry. Trim excess fat and skin (you can save the fat and render it to use as you might use bacon grease). Using a knife, cut small slits into the skin of the duck (although try to avoid slicing into the flesh). This allows the fat to render.
Mix together salt, pepper, and lemon zest in a small bowl (you can really add other spices [like coriander] but I wanted to keep mine simple) and cover duck in mixture. Refrigerate uncovered for a few hours (ideally 24+ although less is fine).
Before baking, bring duck to room temperature and fill cavity with desired herbs, garlic cloves, and sliced lemon. Place breast side down in a roasting rack placed in a roasting pan
Bake 30 minutes in a preheated 450 degree oven.
Reduce heat to 350 and bake an additional 30 minutes.
Remove from oven and flip over so breast is now up.
Bake an additional hour and a half, or until duck has reached 175-180 degrees.
I served mine as I would serve a turkey, with the legs sliced off, breast meat cut into thick slices, and thigh meat shredded. I think this makes for an appealing presentation and also makes the duck (or any bird) easy to eat.
Russian Tea Cakes

Every year, right around Thanksgiving, my dryer starts to shrink all of my clothes and they all get tighter and tighter with each passing day. It’s weird, since I’ve lived in different houses and apartments and no matter how new or old the dryer is it breaks the same time each year. Then right around the middle/end of January my dryer starts to enlarge my clothes and they start to fit correctly again, especially the waist of my pants. Does anyone else have this problem?
On a completely unrelated note to my clothes shrinking, here is another dessert recipe (the fourth one this week)…
Russian Tea Cakes (aka Russian Tea Cookies, Mexican Wedding Cookies, butterballs, and probably other things) are little crumbly, sweet, nutty, concoctions of goodness. Packed with pecans and dusted with powdered sugar, they manage to be sweet, but not excessively so, and would be a welcome gift or dessert brought to a potluck. They’re versatile (delicious with pecans [my personal favorite], walnuts, hazelnut, macadamia, or probably any kind of nut) and are a great make ahead item as they store really well (in an airtight container at room temperature) for well over a week. They’re quite simple to make, only require a few ingredients, but somehow seem very complex.
Traditionally they’re small, spherical shapes that one could easily just pop in their mouth, but I like mine a bit larger than usual (and as a result, they tend to spread a bit). Why do I like them larger? Because cookies all have the same amount of calories regardless of their size, right?!?!? Why eat two small cookies with twice the calories of one large cookie? I have great logic…
Russian Tea Cakes
From Emeril Lagasse (although most recipes are practically the same)
- 1 cup unsalted butter, at room temperature
- 2 teaspoons vanilla extract
- 1/2 cup powdered sugar, plus more for rolling cookies
- 2 cups flour
- 1/4 teaspoon salt
- 1 heaping cup chopped pecans
Preheat oven to 375 degrees. On a parchment lined baking sheet, spread pecans out in an even layer. Place in preheated oven and bake for 5-7 minutes, or until aromatic (keep an eye on them as they can go from perfectly toasted to burnt rather quickly). Remove from baking sheet and let cool.
Lower oven to 325 degrees F.
In a food processor, pulse cooled pecans until finely ground (or very, very finely chop with a knife if you do not have a food processor).
Cream butter in a large mixing bowl. Add the vanilla then gradually add the 1/2 cup powdered sugar, beating until light and fluffy. In a medium bowl, sift the flour and salt (be sure to yell “BAM,” Emeril style), add gradually to the butter mixture. Add the pecans and mix well.
(Most recipes specify to chill the dough for a minimum of 30 minutes at this point. This particular recipe didn’t [and I forgot that I typically do chill the dough] so I formed the balls immediately. The dough was sticky, but I didn’t notice much change in quality between refrigerated v. non-refrigerated dough. So do whatever your heart desires.)
Shape the dough into 1 1/2-inch balls and place 2 inches apart on baking sheets lined with parchment of silicon mats. Bake for 20 minutes, or until edges are very lightly browned. Let cool for a few minutes before gently rolling in powdered sugar. Cool on wire racks before storing in an airtight container. I usually dust with additional powdered sugar before serving.

Spiced Cookies with Candied Ginger

So, don’t get me wrong, I have an amazing life, but sometimes I feel it’s lacking spice and crazy adventure. I never do wild things, but that’s probably due to my crippling fear of heights, excessive speed, clowns, chickens, glaciers, electric lines, and large containers of milk. I think the most daring thing I’ve done in the past two years is say I was going to go zip lining. Of course I didn’t, because that sounded terrifying when I actually thought about it.
Wanting to spice things up a bit I literally decided to add some spice to my life… via the kitchen!
Every holiday season I always end up eating a few “ginger” cookies that have the texture of cardboard and the flavor of flour. If you’re going to give something a name with ginger in it I think it had better be intense in flavor. Knowing there had to be a rich and spicy ginger cookie out there I searched the interwebz for a recipe that would really pack a punch. And seeing as you can find everything on the world wide web, I of course found a cookie recipe that was truly amazing.
With a healthy amount of fresh cloves and a generous amount of chopped, candied ginger, these cookies from Barefoot Contessa certainly had a ton of flavor. They were pretty easy to make and had a flawless texture consisting of a crunchy exterior and creamy, soft, slightly chewy interior. Best of all, even on day 5 these babies were perfect.
Spiced Cookies with Candied Ginger
Adapted, just a smidge, from Ina Garten
- 2 1/4 cups all-purpose flour
- 1 teaspoon baking soda
- 2 teaspoons ground cinnamon
- 1 1/2 teaspoons ground cloves
- 1/2 teaspoon ground nutmeg
- 1/2 teaspoon ground ginger
- 1/4 teaspoon salt
- 1 cup dark brown sugar, lightly packed
- 1/4 cup vegetable oil
- 1/3 cup unsulfured molasses
- 1 large egg, at room temperature
- 1 cup candied ginger, finely chopped
- Granulated sugar, for rolling the cookies (about half a cup)
Preheat the oven to 350 degrees F. Line 2 sheet pans with silicon mats or parchment paper.
In a large bowl, sift together the flour, baking soda, cinnamon, cloves, nutmeg, ginger, and salt. In the bowl of a stand mixer fitted with the paddle attachment, beat the brown sugar, oil, and molasses on medium speed for 5 minutes. Turn the mixer to low, add the egg, and beat for 1 minute. Scrape the sides and bottom of the bowl with a rubber spatula and beat for an additional minute. With the mixer still on low, gradually add the dry ingredients to the bowl, scraping the bowl after each addition, and mix on medium speed for a minute or so, until fully incorporated. Add the crystallized ginger and mix until combined.
Scoop the dough with 2 spoons or a small ice cream scoop. With your hands, roll each cookie into a 1 3/4-inch ball and then flatten them lightly with your fingers. Press both sides of each cookie in granulated sugar and place them on the sheet pans. Bake for 13 minutes. The cookies will be crackled on the top and soft inside. Let the cookies cool on the sheets for a few minutes before transferring to wire racks to cool completely.
So delicious you could easily eat the whole batch in one sitting, but you may also store in an airtight container at room temperature for several days.
Kentucky Bourbon Cake

One of the foods I most associate with the holidays is Kentucky Bourbon Cake, which is a dense, heavy, pecan packed cake that has been covered with bourbon. My grandmother makes it every single year and it just wouldn’t be the holidays without it. While some may compare it to a fruitcake, I think that’s blasphemous as I think fruitcakes are awful. However, I guess there are some similarities between the two since both include nuts, dried fruit, and booze. After baking bourbon into the cake, you brush on additional bourbon periodically (ever 4 days or so [or when it starts to dry out]) for a few weeks. Traditionally, my grandmother would make the cake around Thanksgiving and let it “age” for a few weeks before serving it around Christmas. The flavor does actually improve over time but if you don’t have a month, a week and a half or so works almost as well. That means, if you make it now it will be ready for the holidays!
While waiting weeks on end to enjoy this delicious cake is irritating (especially for someone impatient), I promise that it’s worth it. It stores really well, it’s something that can be enjoyed over the course of several days (probably for much longer, but it usually disappears really quickly), is desserty, but not excessively sweet. Since it’s packed with nuts and only has 1 cup sugar in the whole recipe (which is a lot of servings) I’ve decided it’s perfectly acceptable to have it for breakfast, which I usually do.
Kentucky Bourbon Cake
A recipe my family has been making for decades
- 2 teaspoons freshly grated nutmeg
- 1/4 cup bourbon (plus additional for coating)
- 5 eggs (separated into whites and yolks)
- 1/8 teaspoon salt
- 1 teaspoon cream of tartar
- 1 1/2 cup flour (plus an additional 1/4 cup)
- 1/4 teaspoon baking soda
- 1 cup unsalted butter (at room temperature)
- 1 cup sugar
- 1/2 cup currants or raisins
- 4 cups pecans
Spread pecans on a sheet tray in an even layer and toast in a preheated 375 degree oven for 5 to 7 minutes, or until very aromatic. Let cool and chop.
Soak nutmeg in 1/4 cup bourbon. Set aside.
Coat pecans and currants with 1/4 cup flour. Set aside.
In a stand mixer fitted with the whisk attachment, beat egg whites until frothy. Add in salt and cream of tartar. Whip until stiff and fluffy, but not dried out. Remove from bowl and set aside.
In the same stand mixer bowl (I don’t even bother cleaning it out), beat butter and sugar with a paddle attachment until light and fluffy, approximately 5 minutes. Add egg yolks and blend until mixed.
In a medium bowl, sift together 1 1/2 cups flour and baking soda. Gradually mix in to butter mixture until just mixed. Mix in nutmeg and bourbon mixture. Gently fold in egg whites until just blended. Gently fold in pecan and raisin mixture.
Pour batter into a greased and floured bundt pan. Bake in preheated 325 degree oven for 1 hour 15 minutes.
Once cooled, remove from pan, and brush with additional bourbon (about a few tablespoons). Wrap tightly and store for at least a week and a half, periodically brushing cake with additional bourbon every 4 days or so.

White Chocolate & Cranberry Shortbread

I don’t typically buy many packaged desserts since I think homemade is usually better. How many times have you been disappointed with a mediocre sheet cake from the grocery store or a stale cookie from the bakery section? That’s not to say we don’t all have bad days in the kitchen (I make plenty of subpar and disastrous dishes) but more often than not I’m pleased with my cooking and baking skills.
The one time of year I go a bit crazy buying pre-made cookies is during Girl Scout Cookie Season (which, as of the day of writing, is only 50 days away!). I like almost all of the cookies but the shortbread is without a doubt my favorite and I buy way too many boxes and eat them way too quickly.
Oddly enough I typically forget about shortbread the rest of the year. And I don’t know why. Shortbread, in it’s most basic form, is butter, flour, sugar, salt, and vanilla. How simple? While even the most simple shortbread is mouthwateringly delicious, the possibilities are really endless. You can dip them in chocolate, cover them with frosting, or mix in any variety of additional flavorings and ingredients. I love tea shortbread (mixing in ground tea leaves into the batter) and stirring in finely chopped pecans is also phenomenal.
With the holidays coming up I thought mixing in white chocolate chips and dried cranberries would be festive and I have to say my hunch had good results. Their appearance was not only Christmasy, but the chewiness of the cranberries, creaminess of the chocolate, and buttery yet crunchy crumb of the shortbread really made for a trifecta of awesomeness.
White Chocolate & Cranberry Shortbread
Basic shortbread recipe from Claire Robinson
- 1 cup (2 sticks) butter, room temperature
- 3/4 cup powdered sugar
- 2 cups all-purpose flour
- 1/2 teaspoon salt
- 1 teaspoon pure vanilla extract
- 1/2 cup dried cranberries
- 1/2 cup white chocolate chips
In the bowl of a stand mixer, fitted with the paddle attachment, cream butter and sugar on medium speed until light and fluffy (approximately 5 minutes). Gradually add in flour, salt, and vanilla, and mix until combined. Stir in cranberries and white chocolate.
Place dough on a sheet of plastic wrap, and roll into a log, about 2 1/2-inches in diameter. Tightly twist each end of wrap, and chill in refrigerator for 30 minutes.
Preheat oven to 375 degrees F.
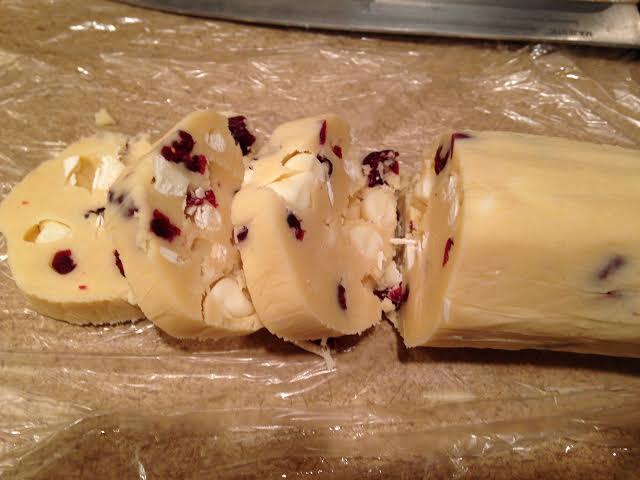
Slice the log into 1/3-inch thick disks (since there are some chunky ingredients the slices may not look perfectly smooth, but they even out once baked). Place on parchment or silpat lined baking sheets, 2 inches apart. Bake until the edges are just brown, about 12 minutes. Let cool on sheets for 5 minutes, then transfer to wire racks and cool to room temperature. Once baked these stay fresh and delicious for several days, although I doubt they’ll last that long.


Recent Comments